

If you’re an app developer or marketer, you know that your Android app must be submitted on the Google Play Store through the Google Play Console. But did you know that the Play console is more than just a platform to publish apps on the Google Play Store? It is a tool that can also be used to check organic rankings and audience acquisition through first-party data.
The Google Play Console is a data management and analysis platform for all Android apps that are to be published on the Google Play Store. If you are wondering whether the reports you get are reliable, the data is directly from Google itself. The dashboard displays important performance indicators like the number of downloads, daily users, region-wise downloads, and so on. For app developers and marketers, the Google Play Console can be a great tool to plan and optimize apps for the Google Play Store.
So, if you’re in for learning more about the Google Play Console, tag along. In this comprehensive step-by-step guide, we will show you how to navigate the console and leverage its features to optimize your app’s performance and maximize downloads.
Whether you’re a seasoned developer or just starting out, this Play Store Console guide will walk you through every aspect of the Google Play Console. From creating a developer account to analyzing user feedback and improving app visibility, we’ve got you covered. You’ll learn how to set up your app listing, track key performance metrics, and implement strategies to boost your app’s ranking in search results.
What Is the Play Console?
The Google Play Developer Console, aka the Google Play Console, is a tool used by Android app developers and marketers to publish, update and market their apps on Google Play Store. But what many people need to learn about this platform is that it is not just for promoting the final draft of your Google Play Store app. The Google Play Console is also a management tool that provides data on key performance indicators. The data comes directly from Google and is displayed on the app’s dashboard.
Now, there are two sorts of people who benefit from all this data – app developers and app marketers.
Developers can use the KPIs to make changes in the code and update apps according to what the users like. The app marketers can optimize the app’s description and the marketing tactics used for the app. Each user can select various KPIs based on their requirements for updates.
Moreover, there are filters for the statistics tab based on region, ratings, devices, and so on. For the developers, there is:
- A reviews section,
- a production tab (which portrays the release performance indicators, regions where the app is live, and other information),
- a testing tab (for all the testing and reviews reports),
- an app bundle explorer, and various other options.
In short, the Google Play Console developer tool is a highly useful platform for developers and app marketers.
How to use the Google Play Console

If you have an app, you’d be searching for ways to correctly use the Google Play Developer Console to gain the maximum audience for your app. Using this tool is pretty simple once you get your hands on it. There are sections and tabs on the dashboard that you can choose to see or not. Let’s look at all of them and learn how to use them.
But first, you’d want to know how to set up your Play Console account.
Setting up your Google Play Console account
To get started with the Google Play Console, you need to create a developer account. Follow these steps to set up your account:
- Go to the Google Play Console website and click on Get Started.
- Sign in with your Google account or create a new one if you don’t have an existing account.
- Agree to the terms and conditions and pay the one-time registration fee, if applicable.
- Fill in your developer profile information, including your company name, contact details, and payment preferences.
- Once your account is set up, you can access the Google Play Console dashboard.
Now that you have your Google Play Console account ready, let’s explore its features and functionalities.
Once you’re familiar with the features of the Google Play Console, it’s time to upload and manage your app. Here’s a step-by-step guide to help you through the process:
Publishing, Uploading and Managing your App on Google Play Console

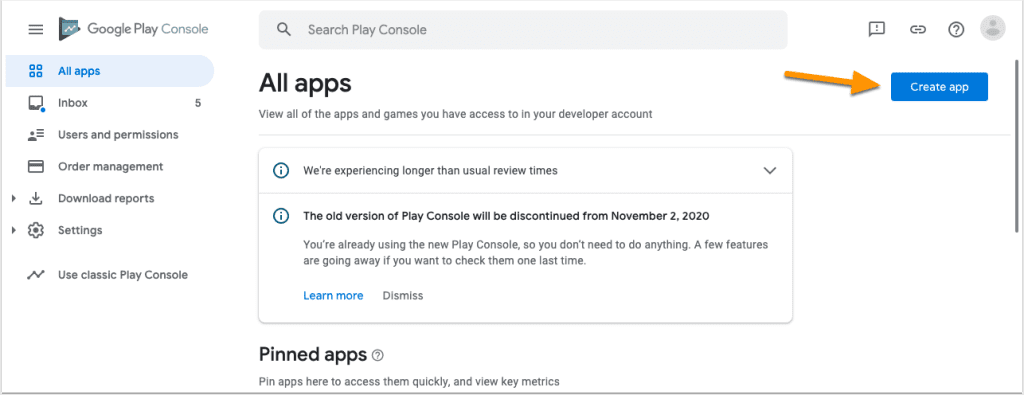
- Click on the “Create Application” button on the app dashboard.
- Select the default language for your app and provide a title for your app.
- Fill in the store listing details, including a description, screenshots, and promotional graphics.
- Choose the appropriate category and content rating for your app.
- Upload the APK file for your app, along with any additional files or resources.
- Set the pricing and distribution options for your app.
- Review the app’s details and publish it to the Play Store.
Now there are three releases you can set up through your Google Play Console login. One is app publishing, where you get to see the status of the app’s availability and who gets to use the app.
The updated publishing status is in play when the developers update the app and roll it out to the audience. The third part is item update, related to the addition or omission of a specific item or part in the update.
Once your app is published, you can monitor its performance and push updates.
Main Dashboard
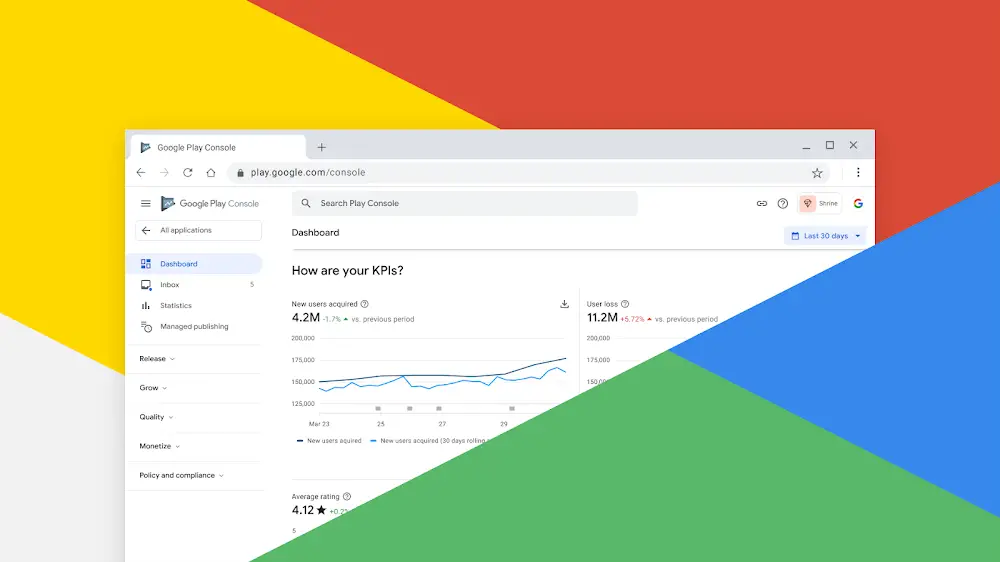
As you log in to your account and select the app you wish to get all the management data for, you will have the main dashboard on the screen along with inbox messages overview of the KPIs, and on the left, there is a sidebar with many other options.
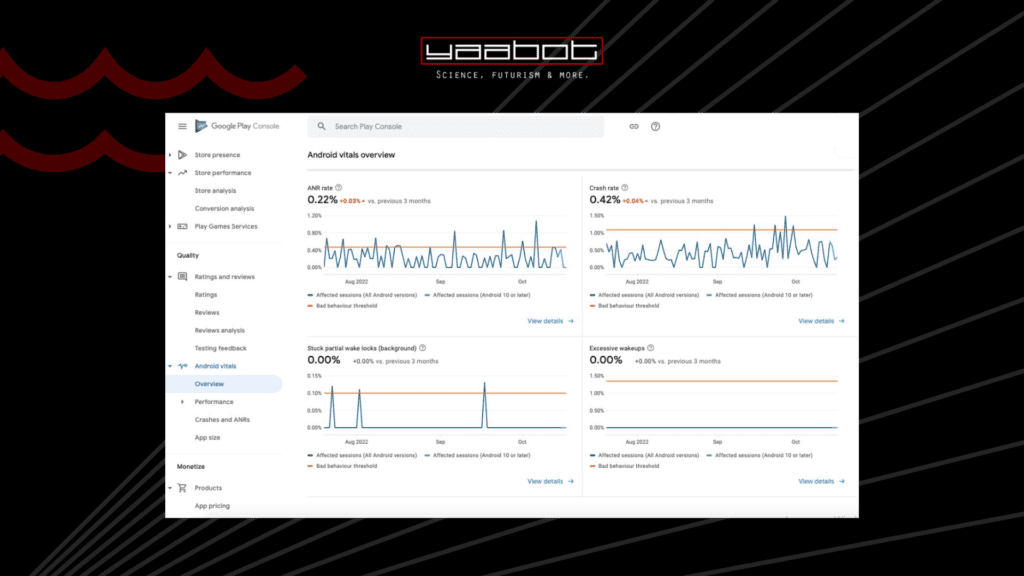
The main dashboard has comprehensive information regarding your app. It consists of the KPIs (you get to select all indicators you wish to see), listing performances (conversion rates, traffic sources, highest performing regions, etc.), Android vitals, ratings, app size, and so on. As a developer or marketer, you must know how to utilize all this information.
Statistics

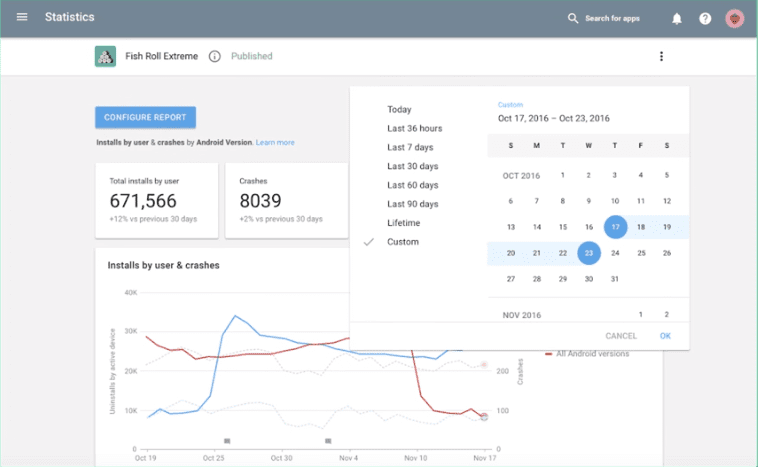
Next, as a developer, you will wish to compare the performance alongside getting data-driven statistics points. That is why the statistics tab contains multiple data points you can go through to get all the necessary information. Some data points you select for the statistics tab are; user data, install and uninstall events, engagement, ratings, quality, monetization, pre-launch ratings, and the Google play store listing performance.
Now as you have your data points, you can also add the filters related to the region, language, device type, Android version, app version, carrier, and so on. In short, the Google Play Console developer tool allows easy reporting and analysis of the app.
Using Google Play Console for app marketing and promotion
The Google Play Console offers a range of marketing and promotion tools to help you attract users and increase app downloads. Here are some key strategies to consider:
- Create compelling screenshots and videos that highlight your app’s features and benefits. Visual content plays a crucial role in attracting users and convincing them to download your app.
- Run app install campaigns using Google Ads to reach a wider audience. Set a budget, target specific user demographics, and monitor the performance of your ads to ensure maximum impact.
- Utilize the “Store Listing Experiments” feature to test different variations of your app listing. This allows you to gather data on which elements perform best and make informed decisions about optimizing your app’s visibility.
Troubleshooting common issues on Google Play Console
While the Google Play Console is a powerful tool, it’s not without its challenges. Here are some common issues developers may encounter and how to troubleshoot them:
- App rejection: If your app is rejected during the review process, carefully review the rejection reasons provided by Google. Address any issues or violations and resubmit your app for review.
- Crashes and bugs: If your app is experiencing crashes or bugs, analyze crash reports and user feedback to identify the root cause. Work on fixing the issues and release updated versions of your app to provide a better user experience.
- Low visibility or downloads: If your app is not receiving enough visibility or downloads, consider revisiting your app listing and optimizing it for better discoverability. Experiment with different ASO strategies and marketing techniques to improve your app’s performance.
FAQ: Can I Download An APK from the Play Console?
As a developer, you can download the generated APK of the application through your Play Console developer login. Downloading the generated APK is a part of the update publication part. The developer must first create a new edit (use edits: insert) and then specify the app you wish to update. Select the uploaded bundle you wish to publish and make the input edits.bundles : upload.
Now, you should be careful about not directly releasing the updated version to the public. Use the command edits.track : update to assign the update bundle to a track. Then make the edits on the draft and download the generated APK from the bundle you uploaded. The steps are prompted in the API for the same.
Now process the APK, and if you wish any changes, repeat step one. After you are done, roll out the final release using edits.tracks: an update.
If reading all this seems too technical, you can also watch this very helpful video for a guide to the Google Play Console for an app marketer.

The Bottomline
Now that you’ve learned about the steps involved in releasing, updating, and optimizing an app through this Google Play Console guide, you’d see that it is an easy-to-use and highly intuitive tool that can help developers and app marketers improve an app’s performance. Multiple KPIs and statistics are useful in understanding the app’s performance. You can easily roll out updates through easy commands and ensure that your app is up to date with what the audience requires.
So, for all the app developers and marketers, the Google Play Developer Console is a critical tool.