
On your next birthday, a photo might pop up that you almost threw into the bin.
And for a birthday, a cartoon greeting of one of your awkward photos might look better than a studio shot. That’s exactly what Google Photos Remix does. It turns an existing picture into something playful enough to share, without you designing something from scratch.
In this guide, we’ll learn how to use Google Photos, go to Create, choose Photo Remix, select a template, add your picture, and generate a result.
Key Takeaways
- Google Photos Remix creates AI illustrations of existing pictures.
- The Create tab is the starting point. Templates can change over time, so an older tutorial’s screenshots may differ from your app.
- Access depends on eligibility and location. An updated app can’t guarantee that every Google Photos AI feature appears on your account.
- A clear source photo makes a sensible starting point. So try to mention recognizable features, small details, and any text that you want in your illustration.
- Choose photo editing tools according to the job. Basic corrections, generated illustrations, and animated clips require different controls.
What Is Google Photos Remix, and How Does It Work?
Google Photos Remix uses generative AI to turn an existing picture into a new image based on a chosen style or template. You select a photograph, choose the look you want, and generate a result.
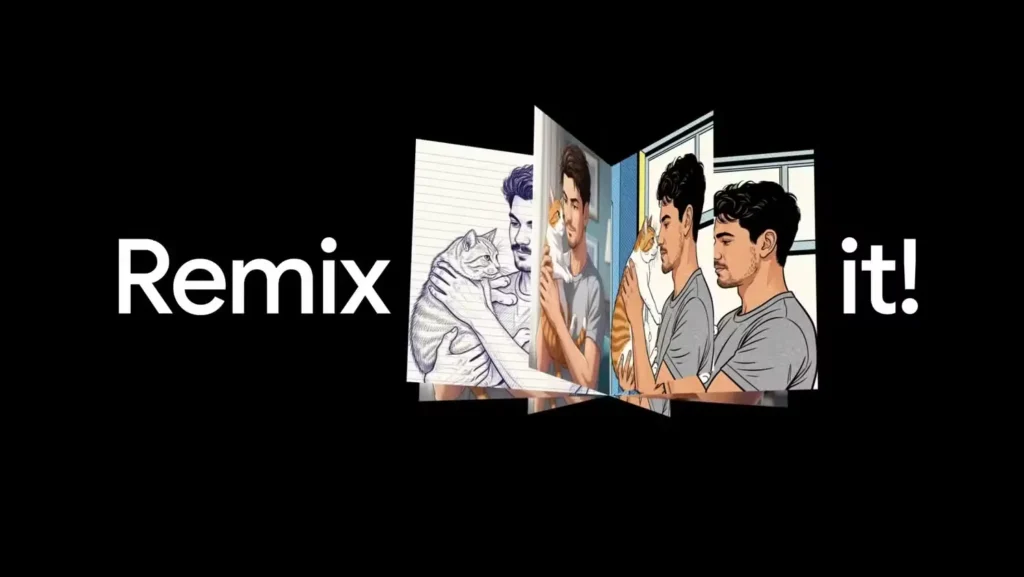
Here’s what happens during a photo remix:
- Your photograph provides the starting point: Remix uses the selected picture as a reference for the generated image.
- The template sets the creative direction: Google’s original styles included anime, comics, sketches, and 3D animation looks.
- AI creates a new interpretation: Facial features, backgrounds, and small details may change, so check whether the subject looks recognizable or not.
- You review the result: Save a version you like or regenerate to try another interpretation within the same template.
A 3D animation style gives a still picture a cartoon appearance. And if you want to add some movement, Google Photos offers a separate Photo to video tool.
What Do You Need to Use Google Photos Remix?
The source photograph and your account are the first steps before going on to choose a template.
Google’s AI creation requirements specify the following:
- Age: Google Photo Remix is available to users aged 18+.
- Account: Use a personal Google Account. Workspace and school accounts are excluded from these creation features.
- Photo: The picture you want to transform must be backed up.
- Connection: Generating a result requires network access.
- Location: Availability varies by region, and individual features can have additional requirements.
Remix works for Android and iPhone, but that doesn’t mean similar access for every account. Some personalized templates also have separate Gemini eligibility conditions.
Checking the active account comes before troubleshooting the phone. Switching between a work account and a personal account can change which requirements apply.
How to Use Google Photos Remix on Android and iPhone
The workflow moves from a template to a source picture, then to a generated result. You’d need one portrait and one clear purpose, such as a birthday greeting, so there’s a useful way to judge the output.
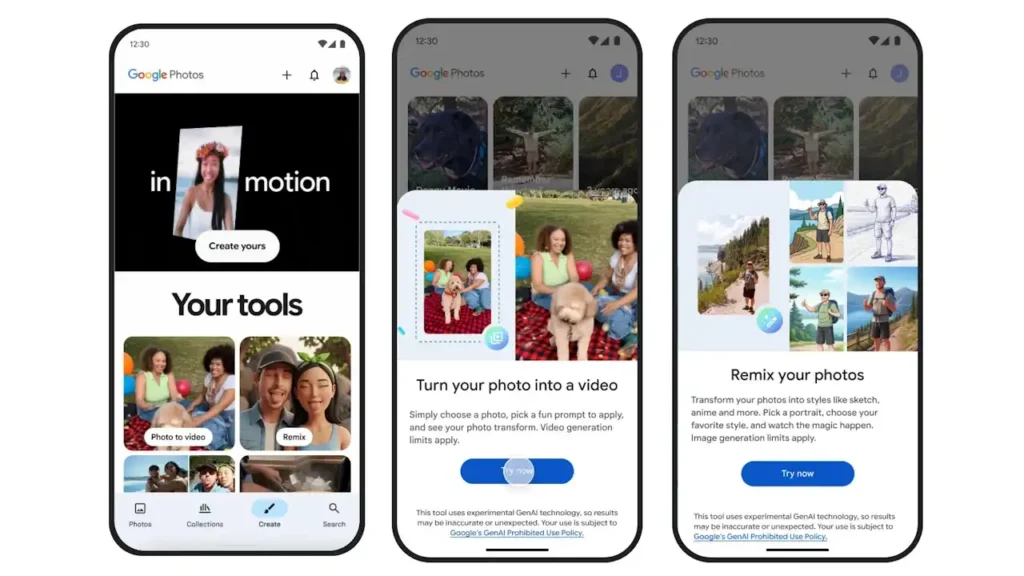
Open Photo Remix from the Create Tab
Open Google Photos and look for Create along the bottom of the app. From there, open Photo Remix, or select a featured card under Remix your photos.
Read the acknowledgment screen if it appears, then continue with Try now.
Older instructions can look different. Google’s August 2025 community walkthrough used a Create new entry point at the top right.
The current Create tab is the first place to look. If you can’t find the tool, move to the troubleshooting section.
If you’re helping a friend find it, send a screenshot of your Create tab with the relevant label visible. That’s much easier to follow than navigating based on your memory.
Choose a Template, Add Your Photo, and Generate
Google’s walkthrough explains the template and reference-photo controls. Both Android and Apple devices have a similar sequence, although the labels can still differ.
- Browse the templates: Open the full selection or use a featured option.
- Select a direction: Choose a template that fits the image you want to make.
- Add your reference photo: Follow the photo-selection control shown for that template.
- Confirm the picture: Check that you selected the intended image before generating.
- Tap Generate: Allow the app to produce the result.
Some badged, personalized templates can begin without asking you to upload a reference picture. For this tutorial, I’d choose an option that lets me supply the photograph myself.
My template choice would depend on the destination. A greeting card needs enough room for a readable message. And an avatar should remain recognizable when displayed small.
For a useful comparison, change either the source photograph or the template between attempts. Keeping one choice fixed makes it easier to decide which change improved the result.
For a birthday card, my first attempt would be to use a portrait with space around the subject. And if the illustration works but the greeting needs some rewriting, I would add my own message before sharing.
Review, Regenerate, Save, and Share Your Photo
Check the result before tapping Save. If the style’s suitable but the photo isn’t looking good, tapping Regenerate gives you another chance to redesign within that same template.
This is how it looks in order:
- Keep it: The subject is recognizable, and the image suits its purpose.
- Try another result: The overall direction works, but a face or detail looks awkward.
- Change direction: The template changes the picture more than I’d like.
Save a version you want to retain. You can find your creations in Photos and search for them using “Creations.”
Reopening the saved image before sending it is a useful final check, especially after generating several similar versions. That prevents sharing the wrong attempt.
Photo Remix Styles and Templates: What Can You Create?
Photo remix templates provide you with different creative directions. In September 2026, Google announced 15 new Remix templates, including birthday cards, photo booth shots, and red carpet looks. The update specifies Android and iOS availability in select countries.
Here is how I’d approach it:
| Style or template | Where I’d use it | What I’d check |
| Anime or comic | Illustrated avatar or playful reaction | Whether the face remains recognizable |
| Sketch | Portrait for a personal message | Whether facial details look coherent |
| 3D animation style | Cartoon interpretation of a person or pet | Whether the subject’s distinctive features survive |
| Birthday card | Greeting shared with friends | Any generated wording and space for a message |
| Photo booth | Casual social post | Expressions and consistency across the result |
| Red carpet | Themed party image | Whether the invented setting suits the joke |
I would prefer previewing a style against the source photograph before deciding where to use it. Google says options can change or disappear. If a named style is unavailable, choose a currently offered template that serves the same purpose.
How to Get Better Results from Google Photos AI
A clear source picture is the perfect starting point for Google Photos AI. It gives you something recognizable to compare with the output.
Google’s Remix guidance recommends well-lit, focused, front-facing portraits with one or a few subjects. It also warns that generated images may not perfectly match the source.
I’d use this checklist when choosing a picture:
- Visible face: Choose an image where the person’s clearly visible. A heavily obscured face makes it harder to evaluate.
- Useful lighting: Always prefer a picture where eyes and facial features are visible.
- Manageable composition: Start with a simple portrait before going for a crowded group photograph with overlapping people.
- Relevant detail: If glasses, a hairstyle, or a pet’s markings are important to you, check them explicitly in the finished image.
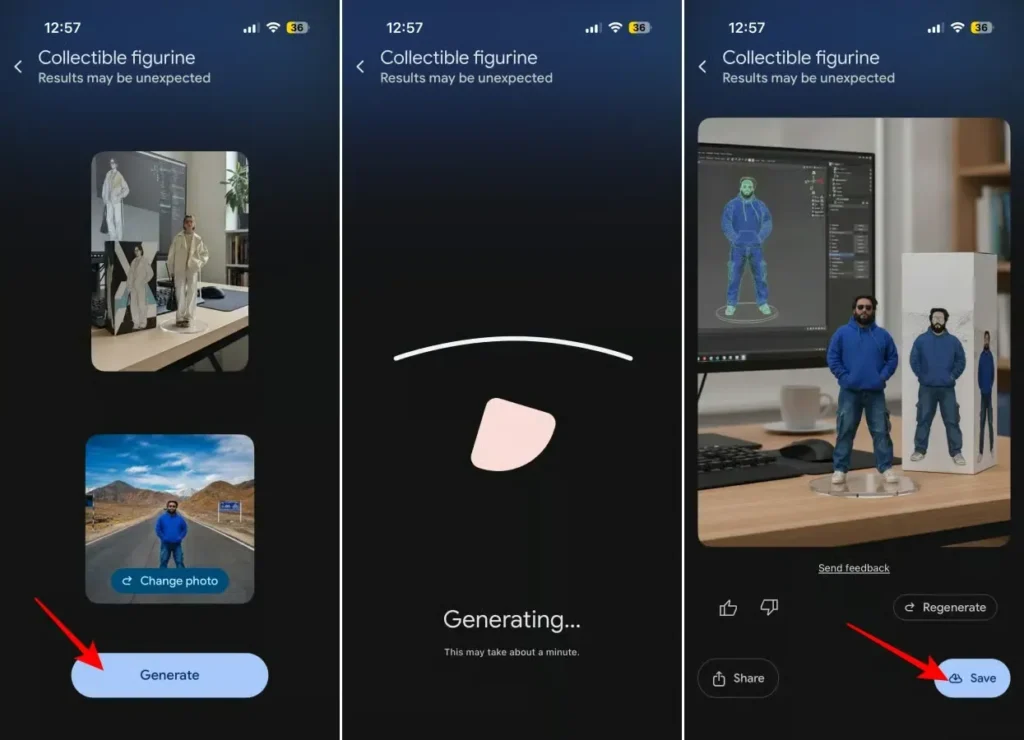
For a useful comparison, keep a fixed template and try a clearer photograph. Compare likeness, distracting distortions, and suitability for that post. This gives you a concrete way to evaluate Google Photos AI.
View the image at its likely display size too. An avatar that looks attractive full-screen might become hard to recognize in a small chat icon.
Google Photos Remix Not Showing or Working? What to Check
If Google Photos Remix isn’t working or it’s missing, these are the checks you should follow.
| Problem | What I’d check first | Sensible next action |
| Photo remix is missing | Active account and location eligibility | Check official requirements and available app updates |
| A picture cannot be used | Its backup status | Finish backing it up before retrying |
| Generation fails | Network access and the displayed error | Restore the connection or follow the error guidance |
| Another attempt is unavailable | A generation-limit message | Wait for the allowance to renew or review plan options |
| A familiar template disappears | The currently available catalog | Choose another template suited to the same use |
Google documents limited daily generations, with Google AI plans providing higher allowances. Paying for a plan shouldn’t be treated as proof that every feature is available in your location. So, paying for a plan doesn’t mean you’ll get every feature.
Keep a note of the exact error wording before trying again. It gives support something concrete to investigate if the problem continues.
Avoid reinstalling the app as a guaranteed fix. It can’t resolve an account restriction, and repeated attempts will not create a new daily allowance.
Google Photos Remix vs Other Photo Editing Tools
My choice of photo editing tools starts with what I want.
| Tool | Best suited to | Input and output | Main control |
| Photo remix | Creative reinterpretation | Photograph to generated image | Template choice and regeneration |
| Standard Google Photos editor controls | Cropping, rotation, and basic adjustments | Photograph to edited photograph | Direct editing controls |
| Photo to video | Giving a still picture movement | Photograph to video clip | Available effects or prompts |
| Remix in Google Messages | Creative images within conversations | Photograph to generated chat image | Suggested or custom prompts |
Google documents ordinary editor controls separately from its creation tools.
The Google Messages Remix guide describes writing your own prompt inside a conversation. Those instructions shouldn’t be copied into a template-based Photo remix.
When I’d skip Remix: For an ID picture, an accurate product listing, or a photograph documenting an event, I want to preserve the details.
What to Check Before Sharing a Remixed Photo
Before sharing a remixed picture, you must review the image and its context together.
- Check the subject’s comfort: Ask before posting an altered portrait of someone else, especially when the change affects their appearance or setting.
- Inspect readable details: Check generated wording, logos, and anything viewers might interpret as a real claim.
- Explain invented scenes: Try to add a short “AI remix” caption. It helps when an image could suggest someone attended an event or visited a place.
- Keep the source: Retain the original picture for future edits and an accurate record of the moment.
Google’s creation announcement describes SynthID watermarking for these AI tools.
A readable explanation is still useful when you’re searching for content. Viewers shouldn’t need to inspect hidden signals to understand a birthday joke.
Final Thoughts
I’d start Google Photos Remix with a clear portrait and a modest goal, like making a birthday greeting. Then choose the template, generate a result, and inspect it at the size people will see.
If the picture needs to preserve some precise details, I’ll use the Google Photos editor controls suited to those adjustments. Save the creative version you like, keep the source photograph, and add context before sharing an invented scene.
For more information on AI, tech, Science, Futurism, and more, check Yaabot.
FAQs
Google Docs is limited to users for a daily allowance and increased generation limits with Google AI plans. A subscription is NOT an indication of coverage, as eligibility still exists.
Use the mobile app for this walkthrough. Google’s computer help page lists creations but does not document the same step-by-step Photo Remix workflow.
Google’s reference-photo workflow describes selecting a picture for a creation. It doesn’t document batch processing, so I’d plan to work through photographs individually.
Documented Photo Remix workflow: Templates. Google Messages also features a Remix functionality with prompts. Be sure to read the specific tool before following instructions for custom text.
Remix produces a creation; the steps as documented do not mention deleting the source. I would keep both images and make sure they are right before I take away one.
Google describes quick generation but provides no fixed completion guarantee in these instructions. I’d allow the attempt to finish and follow any displayed error guidance.
